
The Ubiquiti Edgerouter 4 is a fast, powerful, and highly customizable piece of equipment. But, in part because of this, it's more difficult than most commercial routers to set up from scratch. This guide will take you through the setup process from start to finish.
Assumptions
This guide assumes that:
- You have a residential, rather than a commercial, internet connection, and thus that you do not have a fixed IP address on the WAN side (if you do not know what this means, you do!)
- You will be plugging your modem into the Edgerouter via ethernet, rather than via an SFP optical cable (again, if you don’t know what this means, you will!)
- You will be using the Edgerouter with a switch
You will need
Before you begin, make sure that you have the following:
- A computer with an ethernet port (or, if your computer doesn’t have one, as is the case with all modern Apple Macintosh models, an adapter)
- An ethernet cable
- A pen
Before you start
If you have a combination modem/router from your ISP (internet service provider), you will need to put it into “bridge mode” before you start. Essentially, this will turn your combination modem/router into just a modem, and prevent the problems that arise from your having two routers on the same network. The instructions that came with your particular modem/router model should explain how to do this.
WARNING If you have AT&T Fiber, this is not possible without a lot more work,. This is because the modem/router that AT&T provides is needed to authenticate with the network, and thus it cannot by bypassed.
Make your initial connection to the Edgerouter
Use an ethernet cable to connect your computer to the Edgerouter’s eth0 port.

Next, you’ll need to bring up the in-built, browser-based GUI. Out of the box, the default IP address of the Edgerouter is 192.168.1.1. Because there is no DHCP server, you’ll need to manually edit your computer’s TCP/IP settings so you can connect. You should use:
IPv4 Address: 192.168.1.2
Subnet Mask: 255.255.255.0
Router: 192.168.1.1
Apply these settings. Then open your favorite web browser and navigate to https://192.168.1.1. Ignore any warnings about SSL certificates.
Run the setup wizard
The first thing you’ll see is a login screen. The default username is ubnt, and the default password is ubnt. Log in.
Once logged in, agree to start with the default wizard.
In the Internet port (eth0 or eth3/SFP ) section, set “Port” to eth0, “Internet connection type” to DHCP, and make sure that “VLAN,” “IPv4 Firewall,” “IPv6 Firewall,” and “DHCPv6 PD” are unchecked.

Do not check “Bridge LAN interfaces into a single network” in the “Bridging” area.

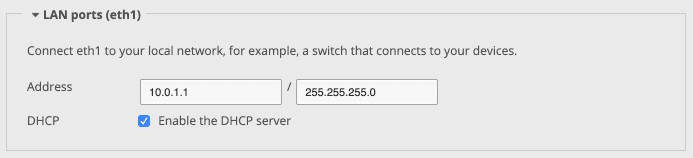
In the LAN port (eth1) section, enter 10.0.1.1 before the / and 255.255.255.0 after it.
Ignore the (Optional) Secondary LAN ports (eth2) section.
Finally, in the User setup area, select “Create new admin user” and set up a new user with a new password. Make sure you write down the details.

Click Apply.
WARNING When you set up a new user, the Edgerouter will delete the default one. So make sure you write down the details correctly.
Move your ethernet cable from eth0 to eth1
After you’ve clicked Apply, you need to physically move the ethernet cable that is connected from your computer from the Edgerouter’s eth0 port to the Edgerouter’s eth1 port.
Next, you’ll need to set your computer to accept an IP address via DHCP, rather than manually.
After about a minute, the Edgerouter should come back up, and your computer should be assigned an IP address. Now you can navigate to the GUI at https://10.0.1.1.
Setting up your modem
The next step is to set up your internet connection. To do this, run an ethernet cable from your modem to the Edgerouter’s eth0 port. In most cases you’ll need to restart the modem having done this. In some cases, you may need to restart the Edgerouter, too.
Test your internet connection
Once your modem comes back up, your Edgerouter should show an IP address in the eth0 field:

SSH into the Edgerouter
The rest of the setup process outlined in this guide will be performed via the command line. Some of the things we are about to do can be done via the GUI, but when you are doing a lot of configuration at once, the command line is much more efficient. Moreover, it’s good to know how to control the router should you lose access to the GUI.
To gain SSH access to the Edgerouter, we will need:
- The IP address of the Edgerouter. This was the address you set using the wizard. In the example above, this is is
10.0.1.1. - The username you set using the wizard (e.g.
charles) - The password you set using the wizard
Using the above variables, to SSH in to the Edgerouter, you’d type:
ssh charles@10.0.1.1
At the password prompt, you’d type your password, and then press Enter.
NOTE In most circumstances, you will not see your password appear on the screen as you type. This is a security measure. Simply type as usual, and then press Enter.
If successful, you will see an output that looks something like this:
Welcome to EdgeOS
By logging in, accessing, or using the Ubiquiti product, you acknowledge that you have read and understood the Ubiquiti License Agreement (available in the Web UI at, by default, http://192.168.1.1) and agree to be bound by its terms.
Linux 10.0.1.1 4.9.79-UBNT #1 SMP Tue Mar 12 16:18:59 UTC 2019 mips64
Welcome to EdgeOS
Last login: Tue May 7 10:12:59 2019 from 10.0.1.x
charles@10.0.1.1:~$
Enter configuration mode
To make changes, you need to enter configuration mode. To do this, you simply type:
configure
You should see the following:
[edit]
charles@10.0.1.1#
You are now able to edit the Edgerouter’s configuration.
Set a hostname and disable unused ethernet ports
First, we will give the Edgerouter a name on the network — in this example, router.your.house. Type the following, followed by the hostname you want the Edgerouter to adopt:
set system static-host-mapping host-name router.your.house
Next, we will label our active WAN port (eth0) and our active LAN port (eth1), and disable the Edgerouter’s two unused ethernet ports — in this case, eth2 and eth3:
      set interfaces ethernet eth0 description Internet
set interfaces ethernet eth1 description LAN
set interfaces ethernet eth2 description -
set interfaces ethernet eth2 disable
set interfaces ethernet eth3 description -
set interfaces ethernet eth3 disable
To save these changes, run:
commit
and then:
save
NOTE The commit command saves the changes to the Edgerouter; the save command makes sure that those changes will persist after a reboot. To get out of the configure mode completely, you simply type exit, but we won’t do that yet.
Enable UPnP
Next, we will enable Universal Plug and Play. UPnP is a set of protocols that allows certain devices on your network to discover each other without the need for manual settings. It can be especially useful if you have a games console such as an XBox or Playstation 4:
      set service upnp listen-on eth1 outbound-interface eth0
commit
save
Set a manual DNS server (optional)
If you intend to use the DNS servers provided by your ISP, or you don’t know what a DNS server is, you can ignore this step. Because you set up your “Internet connection type” to DHCP, the Edgerouter will automatically inherit DNS servers from your ISP.
If, by contrast, you want to set a manual DNS server — for example, a Pi-Hole — you’ll want to do that now. To do this, run (this assumes that your DNS server is at 10.0.1.10):
      set service dns forwarding name-server 10.0.1.10
commit
save
Set up your DHCP reservations (optional)
The Edgerouter will automatically allocate every connected device an IP address within the DHCP range. This IP address may change every 24 hours. For most devices, this is fine. For resources such as servers, however, it makes more sense to force the Edgerouter to hand out the same IP address every time so that you always know where to reach it. This is also known as a “setting a static IP.”
To set a static IP, you need to know:
- The name and subnet of the DHCP server, which you can find in the GUI under
Services → DHCP Server

- The MAC (Media Access Control) address of the device to which you want to assign a static IP address
- The IP address you want to allocate to the device
Assuming that the DHCP server is called LAN1, that its subnet is 10.0.1.0/24, that the device you’re giving a static IP address is a server that you want to label “Server,” that the server’s MAC address is aa:bb:cc:dd:ee:ff, and that you want the Edgerouter to give it the internal IP address 10.0.1.200, you’d run:
      set service dhcp-server shared-network-name LAN1 subnet 10.0.1.0/24 static-mapping Server ip-address 10.0.1.200
set service dhcp-server shared-network-name LAN1 subnet 10.0.1.0/24 static-mapping Server mac-address aa:bb:cc:dd:ee:ff
You can set as many of these as you want. When done, run:
      commit
save
Set up an IPv4 firewall
Next, we’ll set up a basic IPv4 firewall, and limit access to the router’s GUI and SSH interfaces—and to any network address translation (NAT)—to machines that have been explicitly added to a list of trusted external IPs:
      set firewall group address-group Trusted_IPs address 1.2.3.4
set firewall group address-group Trusted_IPs description "External Trusted IPs"
set firewall name WAN_IN rule 10 action accept
set firewall name WAN_IN rule 10 description "Allow Established / Related Traffic"
set firewall name WAN_IN rule 10 state established enable
set firewall name WAN_IN rule 10 state related enable
set firewall name WAN_IN rule 20 action accept
set firewall name WAN_IN rule 20 description "Allow Trusted IPs"
set firewall name WAN_IN rule 20 source group address-group Trusted_IPs
set firewall name WAN_IN rule 30 action drop
set firewall name WAN_IN rule 30 description "Drop Invalid State"
set firewall name WAN_IN rule 30 log enable
set firewall name WAN_IN rule 30 protocol all
set firewall name WAN_IN rule 30 state established disable
set firewall name WAN_IN rule 30 state invalid enable
set firewall name WAN_IN rule 30 state new disable
set firewall name WAN_IN rule 30 state related disable
set firewall name WAN_IN rule 40 action drop
set firewall name WAN_IN rule 40 description "Drop ICMP"
set firewall name WAN_IN rule 40 icmp type 8
set firewall name WAN_IN rule 40 protocol icmp
set interfaces ethernet eth0 firewall in name WAN_IN
set interfaces ethernet eth0 firewall local name WAN_IN
commit
save
With the above lines, we are:
- creating a group of trusted IPv4 addresses named “External Trusted IPs”;
- adding IP address
1.2.3.4to that group; - setting up a rule (10) that allows through the firewall any traffic that is part of, or related to, an already established connection;
- setting up a rule (20) that allows traffic from the “External Trusted IPs” group;
- setting up a rule (30) that blocks any packets that cannot be identified;
- setting up a rule (40) that drops ICMP traffic by default;
- applying these rules to both the router itself (“local”) and to the traffic that passes through the router (“in”)
Naturally, if you want to add more IPv4 addresses (e.g. 987.654.3.21 to your trusted group, in this instance called Trusted_IPs), you’d just run multiple lines of this sort:
set firewall group address-group Trusted_IPs address 987.654.3.21
Port forwarding and NAT (optional)
Next, we need to make some exceptions to the above rules, so that certain types of IPv4 traffic can reach devices behind the router. There are two ways of “poking a hole” in the firewall: “port forwarding” and “NAT.” For the purposes of this guide, we will use port forwarding to allow certain types of traffic that originates from anywhere, and NAT to allow certain types of traffic that originates only from the IP addresses we placed on the Trusted IPs list.
Port forwarding (optional)
As explained above, we will use port forwarding to enable outside traffic to access certain resources on our network, irrespective of where it originates. This can be useful if, for example, you have a Plex Media Server on your network, and you want to be able to watch movies from it from anywhere in the world.
The first step is to enable the auto-firewall and hairpin-nat, and to tie the port forwarding process to our WAN (eth0) and LAN (eth1) ports:
      set port-forward auto-firewall enable
set port-forward hairpin-nat enable
set port-forward lan-interface eth1
set port-forward wan-interface eth0
Next, we need to set some rules. We need to know:
- Which port the outside traffic is coming in on (for Plex, for example, this is
32400by default) - Whether the traffic is TCP, UDP, or both (Plex is TCP only)
- The internal IP address of the device we want to forward that traffic to (let’s assume we have a server running Plex at
10.0.1.200) - The port the internal device is listening on (this can be different, but in our Plex example, it is not by default, so we’d stick with
32400)
Given the variables above, to set a port-forwarding rule, we’d run:
      set port-forward rule 1 description "Plex on Server"
set port-forward rule 1 original-port 32400
set port-forward rule 1 protocol tcp
set port-forward rule 1 forward-to address 10.0.1.2000
set port-forward rule 1 forward-to port 32400
We can set as many rules as we like using this rubric. Obviously, each rule will need a different number.
When you’ve finished setting your rules, run:
      commit
save
Set up NAT (optional)
We’ll use NAT rules in pretty much the same way as above, except in this case we’re going to limit access to the Trusted_IPs list we established earlier. This can be useful if, for example, you have a server that you want to be able to access remotely via SSH, but which you don’t want just anyone to be able to try to access.
Here’s a sample rule:
      set service nat rule 1 description "SSH for Server"
set service nat rule 1 inbound-interface eth0
set service nat rule 1 log disable
set service nat rule 1 protocol tcp
set service nat rule 1 type destination
set service nat rule 1 destination port 22
set service nat rule 1 inside-address address 10.0.1.200
set service nat rule 1 inside-address port 22
set service nat rule 1 source group address-group Trusted_IPs
The above rule tells the Edgerouter to examine any TCP traffic on port 22 that arrives on the WAN port (eth0) and either:
- drop it if it did not originate from an IP address on the
Trusted_IPslist, OR - send it to port 22 on the server inside the network at
10.0.1.200
We can set as many rules as we like using this rubric. Again, each rule will obviously need a different number.
When you’ve finished setting your rules, run:
      commit
save
Set up IPv6 (optional)
Some ISPs offer IPv6 support. If you don’t know what this is, we’d recommend leaving it alone. If you do, running these lines should set you up:
      set interfaces ethernet eth0 dhcpv6-pd pd 0
set interfaces ethernet eth0 dhcpv6-pd pd 0 prefix-length 60
set interfaces ethernet eth0 dhcpv6-pd rapid-commit enable
set interfaces ethernet eth0 dhcpv6-pd pd 0 interface eth1
set interfaces ethernet eth0 dhcpv6-pd pd 0 interface eth1 host-address ::1
set interfaces ethernet eth0 dhcpv6-pd pd 0 interface eth1 prefix-id :1
set interfaces ethernet eth0 dhcpv6-pd pd 0 interface eth1 service slaac
set interfaces ethernet eth1 ipv6 router-advert prefix ::/64
set interfaces ethernet eth1 ipv6 router-advert managed-flag true
commit
save
To confirm that this has worked, we need to exit the configuration mode. To do this, we simply type:
exit
Now we can check to see if both eth0 and eth1 are running IPv6 correctly. To do this, we’ll run:
show interfaces
You should see an IPv6 address under eth0 and an IPv6 prefix under eth1:
Codes: S – State, L – Link, u – Up, D – Down, A – Admin Down
Interface IP Address S/L Description
——— ———- — ———–
eth0 1.2.3.4/21 u/u Internet
2001:558:6043:1e:e112:d0a9:282a:197e/128
eth1 10.0.1.1/24 u/u LAN
2001:db8::1/64
eth2 – A/D –
eth3 – A/D –
lo 127.0.0.1/8 u/u
::1/128
Set up an IPv6 firewall (optional)
Because you have exited configuration mode in order to test your IPv6 configuration, you’ll need to get back in before you make the rest of your changes. To do this, type:
configure
The first step is to set up a basic IPv6 firewall, as we did for IPv4:
      set firewall group ipv6-address-group Trusted_IPv6s description "External Trusted IPv6s"
set firewall group ipv6-address-group Trusted_IPv6s ipv6-address 2001:db8::1/64
set firewall ipv6-name WANv6_IN description "IPv6WAN to internal"
set firewall ipv6-name WANv6_IN rule 10 action accept
set firewall ipv6-name WANv6_IN rule 10 description "Allow Established / Related Traffic"
set firewall ipv6-name WANv6_IN rule 10 state established enable
set firewall ipv6-name WANv6_IN rule 10 state related enable
set firewall ipv6-name WANv6_IN rule 10 log disable
set firewall ipv6-name WANv6_IN rule 20 action drop
set firewall ipv6-name WANv6_IN rule 20 description "Drop invalid state"
set firewall ipv6-name WANv6_IN rule 20 state invalid enable
set firewall ipv6-name WANv6_IN rule 30 action accept
set firewall ipv6-name WANv6_IN rule 30 description "Allow ICMPv6"
set firewall ipv6-name WANv6_IN rule 30 log disable
set firewall ipv6-name WANv6_IN rule 30 protocol icmpv6
set interfaces ethernet eth0 firewall in ipv6-name WANv6_IN
set firewall ipv6-name WANv6_LOCAL default-action drop
set firewall ipv6-name WANv6_LOCAL description "IPv6 packets from internet to router"
set firewall ipv6-name WANv6_LOCAL rule 10 action accept
set firewall ipv6-name WANv6_LOCAL rule 10 description "Allow established and related packets"
set firewall ipv6-name WANv6_LOCAL rule 10 state established enable
set firewall ipv6-name WANv6_LOCAL rule 10 state related enable
set firewall ipv6-name WANv6_LOCAL rule 20 action drop
set firewall ipv6-name WANv6_LOCAL rule 20 description "Drop invalid packets"
set firewall ipv6-name WANv6_LOCAL rule 20 log enable
set firewall ipv6-name WANv6_LOCAL rule 20 state invalid enable
set firewall ipv6-name WANv6_LOCAL rule 30 action accept
set firewall ipv6-name WANv6_LOCAL rule 30 description "Allow ICMPv6 packets"
set firewall ipv6-name WANv6_LOCAL rule 30 log enable
set firewall ipv6-name WANv6_LOCAL rule 30 protocol icmpv6
set firewall ipv6-name WANv6_LOCAL rule 40 action accept
set firewall ipv6-name WANv6_LOCAL rule 40 description "Allow dhcpv6"
set firewall ipv6-name WANv6_LOCAL rule 40 protocol udp
set firewall ipv6-name WANv6_LOCAL rule 40 destination port 546
set firewall ipv6-name WANv6_LOCAL rule 40 source port 547
set firewall ipv6-name WANv6_LOCAL rule 50 action accept
set firewall ipv6-name WANv6_LOCAL rule 50 description "Allow SSH and web traffic from trusted sources"
set firewall ipv6-name WANv6_LOCAL rule 50 destination port 80,443,22
set firewall ipv6-name WANv6_LOCAL rule 50 source group ipv6-address-group Trusted_IPv6s
set firewall ipv6-name WANv6_LOCAL rule 50 protocol tcp
set interfaces ethernet eth0 firewall local ipv6-name WANv6_LOCAL
commit
save
The above firewall does the same as our IPv4 firewall, with three differences:
- Because we are dealing with IPv6 and not IPv4, we do not limit WAN_IN traffic by IP address or group;
- Because of this, we need
WANv6_LOCAL rule 50to limit IPv6 traffic to the router itself (we want to open ports 80, 443, and 22, so that we can access the router’s via SSH and via the GUI using IPv6); WANv6_LOCAL rule 40allows dhcpv6 traffic through to the router itself. This allows your ISP to give your router its IPv6 information even though its IP addresses are not listed in yourExternal Trusted IPv6sgroup
If you have a standard setup, you won’t need to change any of this.
Last, we’ll set up outside access to the devices behind the router. Because IPv6 does not use Network Address Translation, there are no NAT rules or port forwarding rules here. Instead, we need to set up a rule for every single device. In the below example, we’re allowing IPv6 traffic to access TCP port 32400 on a server running Plex, the IP address of which is 2001:0db8:85a3:0000:0000:8a2e:0370:7334.
      set firewall ipv6-name WANv6_IN rule 40 description "Plex for server"
set firewall ipv6-name WANv6_IN rule 40 log disable
set firewall ipv6-name WANv6_IN rule 40 protocol tcp
set firewall ipv6-name WANv6_IN rule 40 destination address 2001:0db8:85a3:0000:0000:8a2e:0370:7334
set firewall ipv6-name WANv6_IN rule 40 destination port 32400
You can add as many of these are you need. If you need to open multiple ports, just add them in sequence, like this:
set firewall ipv6-name WANv6_IN rule 40 destination port 32400,22,80,3306
You can also limit access by source IP, as in LOCAL rule 50 above.
Set up dynamic DNS (optional)
Most residential ISPs do not give you a fixed IP address, which can cause problems if you’re using DNS to access your router (e.g., if you’ve pointed router.your.house at the your router’s IP address). You can get around this by using a “dynamic DNS” service. For this guide, we will use no-ip.
To make this work, you first need to get a free dynamic DNS address from no-ip here, and then to tell your router to automatically update no-ip when its IP address changes.
Assuming that the DNS address you got is yourhome.ddns.net, your user account is youraccount, and your password is yourpassword, you’d run the following:
      set service dns dynamic interface eth0 web dyndns
set service dns dynamic interface eth0 service custom-noip host-name yourhome.ddns.net
set service dns dynamic interface eth0 service custom-noip login youraccount
set service dns dynamic interface eth0 service custom-noip password yourpassword
set service dns dynamic interface eth0 service custom-noip protocol noip
set service dns dynamic interface eth0 service custom-noip server dynupdate.no-ip.com
If you want to keep using your customized DNS address, you’d just set the following in your own DNS records:
router.your.house CNAME yourhome.ddns.net
That way, if your router’s address changes, it doesn’t matter. You’ll always be able to access it from your customized domain name.
Add your router to UNMS (optional)
If you are running UNMS, you can add your Edgerouter to your setup by running the following and including your UNMS key. You can find your key inside UNMS by going to Devices and clicking on Actions → Add Ubiquiti Device, and then Copy UNMS key and paste into device configuration:
      delete service unms disable
set service unms connection [UNMS key]
commit
save
Set up an SSL certificate (optional)
Finally, we will add an SSL certificate that corresponds to the hostname you just set — in our example, router.your.house. This will allow you to securely access the web interface (GUI) of your router both inside and outside your network.
If you do not own a domain name that you can point at your router — or if this is not important to you, you can skip this step. If you do own a domain name for this purpose, set up an A record that points at the WAN IP address of the Edgerouter.
Once that has been done — and the record has propagated, run the following commands (replacing router.your.house with your own address, obviously). Thanks to Github user j-c-m for this script:
      curl https://raw.githubusercontent.com/j-c-m/ubnt-letsencrypt/master/install.sh | sudo bash
configure
set system static-host-mapping host-name router.your.house inet 10.0.1.1
set service gui cert-file /config/ssl/server.pem
set service gui ca-file /config/ssl/ca.pem
set system task-scheduler task renew.acme executable path /config/scripts/renew.acme.sh
set system task-scheduler task renew.acme interval 1d
set system task-scheduler task renew.acme executable arguments '-d router.your.house'
sudo /config/scripts/renew.acme.sh -d router.your.house
commit
save
Now, try to visit https://router.your.house in your browser. It should load over https without any errors. If, having run the script, you find that the GUI will not load, run:
      delete service gui
commit
set service gui
commit
save
Done.
Cost
Products Featured
Update
Some readers were confused when, having used SSH to log in, their passwords did not show up on the screen as they typed them in. We have updated the guide to note that this is expected behavior.
Thank you for an excellent and complete guide to setting up the ER-4 in standard consumer installations.
My question has to do with the first assumption - "you do not have a fixed IP address on the WAN side."
In my setup, my DSL modem is et up by AT&T to provide a small public subnet (255.255.255.248), so I have 5 public IP addresses, of which I use two.
I am not sure whether it is possible to configure my modem so that traffic not sent to the public ip addresses are sent via passthrough to the ER-4, but my public subnet IPs still receive the traffic sent to them.
Many thanks for any thoughts you might have.
Thanks, trying to setup my old edge router poe5 manually. The eth0 port never worked and it sat on my desk to long, (out of warranty) still want to use it. Hoping I can mangle your instructions to set it up and ignore eth0
I like your guide very much!
My Cable internet is fast but very unreliable, meaning the Router/Modem from my ISP loose all 1-2 days it‘s connection! The Router is at least so „smart“ to reboot itself and so it is only a minor problem, but when I used the FritzBox behind the ISP Modem in Bridge Mode the FritzBox doesn‘t reboot itself and must reboot manually!
My question is how the ER behaves in a situation like this when loosing connection! Is there a way to autoreboot the device or other things I can do.
My ISP is not very useful and not willing to help with my problem.
Followed your instructions exactly and the IP address never changes to 10.0.1.1. It always remains 192.168.1.1. I've manually reset multiple times with no help. Any ideas?
Thanks!
Awesome guide.
Question though: I have a PPPOE connection and if I try to setup it but without connecting to the modem the LAN new IP (i.e. 10.0.1.1/24) is not applied to eth1 but instead 192.168.1.1 remains.
Do you think that's due to the fact that I don't connect eth0 to the PPPOE yet?
I wanted to configure the router first before changing the ISP modem with the ER-4.. so that my wife can use the internet without disturbing her 🙂
Or could I set it up as DHCP first (behind the modem) and then change later the eth0 to PPPOE?
Thank you!
I managed to find out the issue. It seems there is a bug in the UI of the wizard: the bridging option appears unselected but in fact it acts like selected. So you have to select it and then unselect it so that the LANs appear separated. The firmware I'm using is 2.0.9.hotfix2 or something like this